spring is here and summer isn't far behind. although you have a lot of cute basics from last year, there are probably a few items in the back of your closet that you are not looking forward to wearing this season. either they are too worn out, out of style, or they just don't appeal to your personal tastes any more. don't toss these items in the trash and don't give them away. it's easy to update your warm-weather-wardrobe from last year so you can look chic this year without spending very much money. here's how:
***
tie dyeing is always a summer signature. it's bright, fun, and can be worn anywhere and anytime when it's done correctly. a common misconception is that tie dye is for children or hippies only. well that's far from the truth. when worn properly, tie dye clothing can look good without looking overdone or sloppy. many designers choose simple tie dye methods for their designs that often times go unnoticed. but if you want to show your summer spirit and kick up your wardrobe with a lot of color, tie dye kits and classic techniques are the way to go.
what you will need:
*dye kit: Tulip brand dye kits are the best quality kits for your project. they are reasonably priced and come in a wide selection of colors.
*white, bleached, or light colored items of rayon, silk, or cotton.
*gloves
*rubber bands
*work space that you can get messy at: outside is best!
*bathroom shower or tub: after your dyed items set for 8 hours, the excess dye won't stain anything if it is promptly removed so don't be afraid to rinse off clothes in the tub
*dryer (optional)
you can dye anything you like; tote bags, scarves, jeans, table cloths. the possibilities are endless. and there are many dye techniques and colors out there. not everyone is into the rainbow swirl. you can dye clothes at home and achieve very unique and satisfying results. plus, it's a fun afternoon activity and doesn't cost much money. dyeing items you tire of is an eco-friendly was to reduce the waste of undesired clothing. you will also feel great knowing you did it yourself!
_______________________________________________________________________________
Tutorials and Tips:
for the projects suggested below, i used a Tulip brand dye kit in Rainbow. this kit comes with five bottle to create five colors; Red, Yellow, Green, Blue, and Violet. the kit includes extra packets of color in case you want to create your own colors or make more of the original colors. the red and yellow combine nicely to create orange and blue and violet make a wonderful indigo. all colors blend and don't clash. the kit costs about $20 but ACMoore and Michael's crafts stores usually put out coupons in Sunday flyers so you can use those should you purchase the kit at either store.
_________________________________________________________________________________
SIMPLE SPIRAL DESIGN SHIRTS:
LEVEL: easy
 |
| pink spiral on graphic tee |
 |
| patriotic spiral on striped tee |
WHAT YOU WILL NEED:
*Tulip dye kit
*white shirts
*dryer (optional)
*plastic bags
*rubber bands
*tub, shower, sink, hose, or bucket or water
WHAT YOU DO:
1. lay out shirts flat and pinch in center begin twisting the pinched area until the entire shirt had been twisted around it. tie with rubber bands, keeping the circular shape.
2. dye with Tulip dyes
3. tie up in plastic bags to prevent color bleeding and drying and let sit minimum of 8 hours. the more time they set, the nicer the colors will be
4. rinse thoroughly
5. if you want a vintage look, dry the shirts in the dryer. the excess dye in the water from rinsing will run and the shirts will have a softer look to them. this is what i did. if you want a sharper look, line dry the garments so the colors don't run and make sure the water ran clear when you rinsed them.
_________________________________________________________________________________
CIRCLE DESIGN TIE DYE RAGLAN TOP:
LEVEL: easy
 |
| hand-dyed vintage look raglan |
WHAT YOU WILL NEED:
*Tulip dye kit
*raglan shirt with COLORED sleeves and WHITE shirt front
*dryer (optional)
*plastic bags
*rubber bands
*tub, shower, sink, hose, or bucket or water
WHAT YOU DO:
1. lay out shirt flat and pinch in center. hold on to the pinch and pick the shirt up making sure that it hangs down from where you are holding it. the sleeves should be at the bottom. hold the pinch and tie rubber bands at two inch intervals around the shirt, getting farther from where you hold it each time. once you reach the sleeves, stop banding the shirt. let the sleeves hang free.
2. dye with Tulip dyes. i suggest starting nearest to the sleeves choosing a dye that is closest to the sleeve color and creating a pattern with the dye. each banded section should be a new color.
3. tie up in plastic bags to prevent color bleeding and drying and let sit minimum of 8 hours. the more time it sets, the nicer the colors will be
4. rinse thoroughly
5. if you want a vintage look, dry the shirt in the dryer. the excess dye in the water from rinsing will run and the shirt will have a softer look to it. this is what i did. if you want a sharper look, line dry the garment so the colors don't run and make sure the water ran clear when you rinsed it.
_________________________________________________________________________________
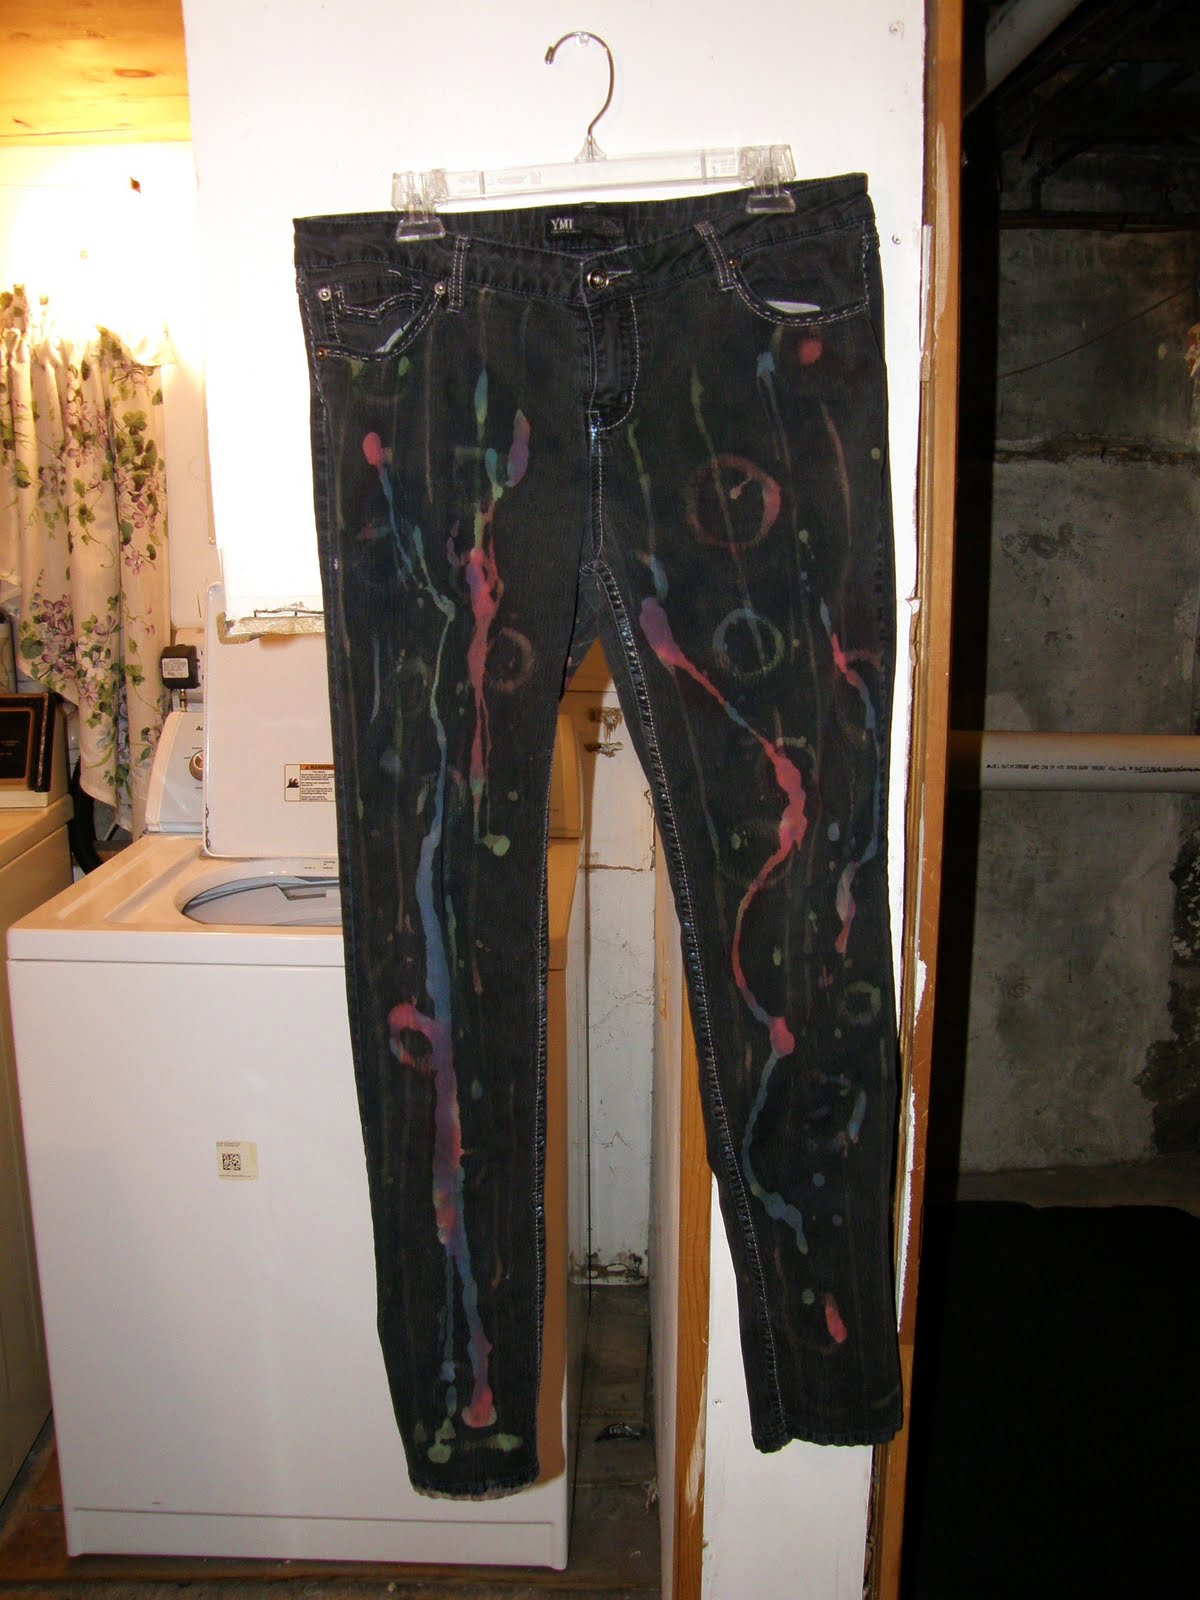
AMAZING TECHNICOLOR PANTS
LEVEL: hard
 |
| hand dyed technicolor jeans |
WHAT YOU WILL NEED:
*Tulip dye kit
*jeans
*bleach (optional)
*washing machine (optional)
*dryer (optional)
*plastic bags
*tub, shower, sink, hose, or bucket or water
WHAT YOU DO:
1.assess your jeans. to make this easier, you should (preferably) start with denim tie dyed jeans like this:
using a pair of jeans like this makes the process super easy and creates the best results. i used a pair of jeans that had a similar effect to begin with. my results were neat because all of the white was covered with the dye and the dark denim showed too. however, if you start with different jeans this is what you can do:
*starting with dark or medium jeans: use a bucket of bleach and soak the pants making sure that they bleach completely. or, use the splatter method to create a unique pattern with the bleach. you can also use a tie dye method with bleach to achieve a tie dyed look on your own. always wash bleached clothes in the washer machine and dry in dryer before tie dying!
*starting with light jeans: use a bucket of bleach and soak the pants making sure that they bleach completely. always wash bleached clothes in the washer machine and dry in dryer before tie dying! you can then use a deep indigo, blue, or black dye to create a pattern or leave as is.
*starting with white jeans: you can then use a deep indigo, blue, or black dye to create a pattern or leave as is.
2. dye with Tulip dyes. you can dye however you like with any technique. i used a freehand technique. i started at the top of the jeans an worked my way down to the ankle with color gradients. i then dyed the back the same way.
3. tie up in plastic bags to prevent color bleeding and drying and let sit minimum of 8 hours. the more time it sets, the nicer the colors will be. depending on how you dyed, you want to fold the pants up a certain way to prevent bleeding. with my technique, i folded the pants in half the long way and in half the long way again and then wrapped in plastic bags, twisted in a circle and placed in one big bag.
4. rinse thoroughly
5. if you want a vintage look, dry the pants in the dryer. the excess dye in the water from rinsing will run and the pants will have a softer look to them. this is what i did. if you want a sharper look, line dry the garment so the colors don't run and make sure the water ran clear when you rinsed them.
image from examiner.com
__________________________________________________________________________________
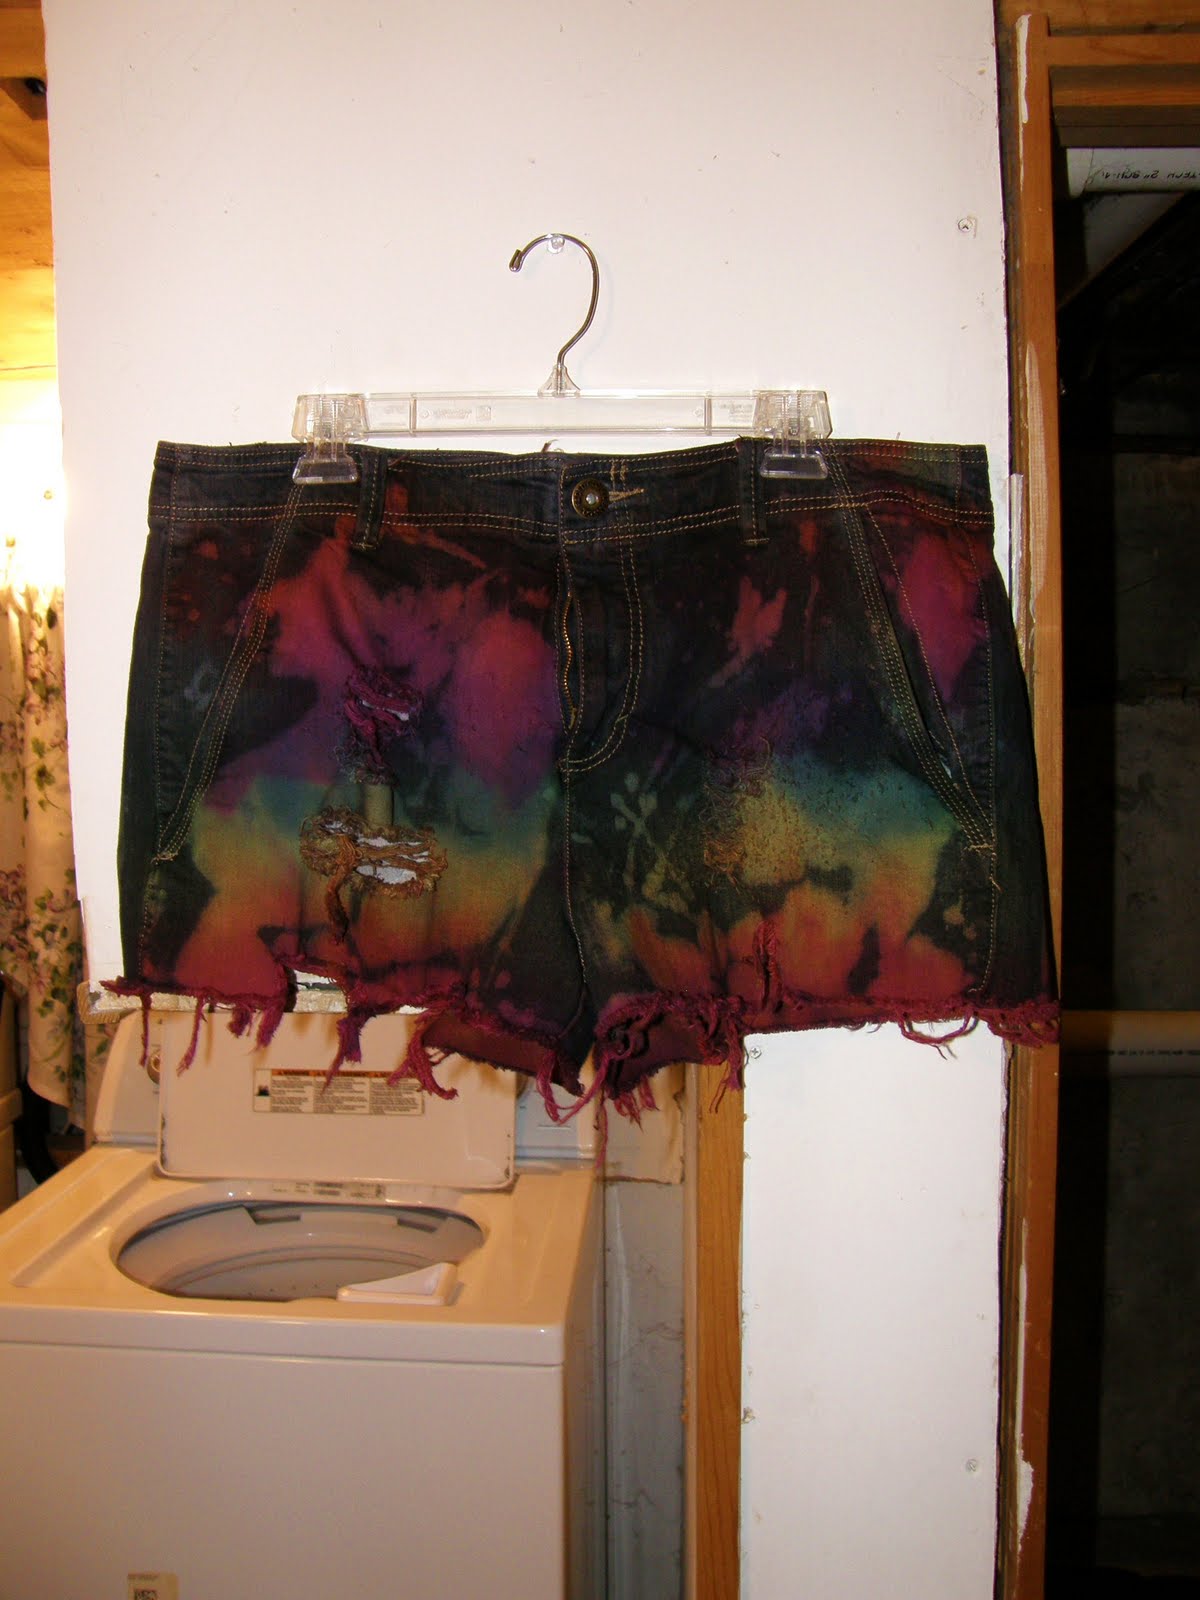
RAINBOW SHORTS:
LEVEL: very hard
 |
| hand destroyed and dyed shorts |
INSPIRED BY:
WHAT YOU WILL NEED:
*Tulip dye kit
*denim shorts
*staple gun (optional)
*thin piece of durable material (ie; rubber, plastic, canvas) (optional)
*bleach (optional)
*washing machine (optional)
*dryer (optional)
*plastic bags
*tub, shower, sink, hose, or bucket or water
WHAT YOU DO:
1.assess your shorts. to make this easier, you should (preferably) start with denim tie dyed shorts similar to the pants mentioned above. they should also be ripped already as creating the store-bought ripped effect properly on your own can be time consuming, impossible, or dangerous if you do not have the correct skills. using a pair of shorts like this makes the process super easy and creates the best results. i used a pair of shorts that were medium blue and had no rips in them at all. to achieve the best results, follow these tips:
-Ripping:
1-using a staple gun, shoot staples through a thin, flexible, durable material. i used a piece of thick rubber.
2- with your new ripping tool, hold tightly and quickly run the staples side horizontally against desired area. this will take a while but work at it. soon, all vertical stitching will be removed from the area to reveal the white horizontal stitching.
3- cut off bottom seams of shorts to create frayed edges.
4- wash in washing machine to make the shorts look rough and beaten
-Bleaching:
*starting with dark or medium shorts: use the splatter method to create a unique pattern with the bleach. you can also use a tie dye method with bleach to achieve a tie dyed look on your own. always wash bleached clothes in the washer machine and dry in dryer before tie dying!
*starting with light shorts: use a bucket of bleach and soak the shorts making sure that they bleach completely. always wash bleached clothes in the washer machine and dry in dryer before tie dying! you can then use a deep indigo, blue, or black dye to create a pattern or leave as is.
*starting with white jeans: you can then use a deep indigo, blue, or black dye to create a pattern or leave as is.
after this step, wash in washing machine no matter what you did.
2. dye with Tulip dyes. you can dye however you like with any technique. i used a freehand technique with color gradients. i then dyed the back the same way.
3. tie up in plastic bags to prevent color bleeding and drying and let sit minimum of 8 hours. the more time it sets, the nicer the colors will be. depending on how you dyed, you want to fold the shorts up a certain way to prevent bleeding. with my technique, i folded the shorts in half the long way placed in one big bag.
4. rinse thoroughly
5. if you want a vintage look, dry the shorts in the dryer. the excess dye in the water from rinsing will run and the pants will have a softer look to them. this is what i did. if you want a sharper look, line dry the garment so the colors don't run and make sure the water ran clear when you rinsed them.
image from plasticbats
________________________________________________________________________________
enjoy your new tie dyed clothing!